
Introduction#
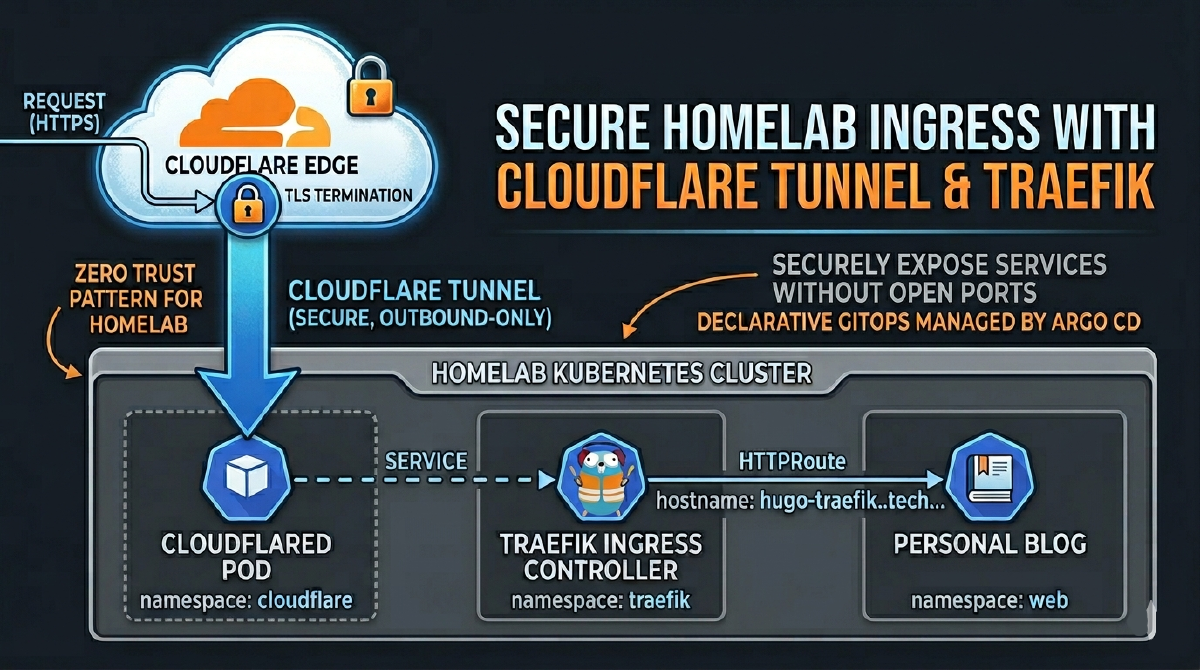
Following on from my posts on establishing a four-repo GitOps structure and deploying the blog itself, the next logical step is to securely expose services to the internet. This post details my approach to using Cloudflare Tunnel and Traefik for a secure, reliable, and fully automated ingress layer, managed declaratively through Argo CD.
This setup mirrors an enterprise-grade, zero-trust network access pattern, adapted for a homelab environment. For a homelab, the primary motivation for using a tunnel is security: it allows me to expose services to the internet without opening any inbound ports on my home network’s firewall. This is a significantly safer approach for this kind of experimental environment. It obviates the need for a static public IP or complex firewall configurations, all while adhering to a strict GitOps workflow.
The Architecture: A Layered Approach#
The traffic flow is straightforward, but the declarative management is what provides its power and resilience. This diagram represents the secure, tunnel-based architecture for exposing our Kubernetes-hosted blog to the internet.
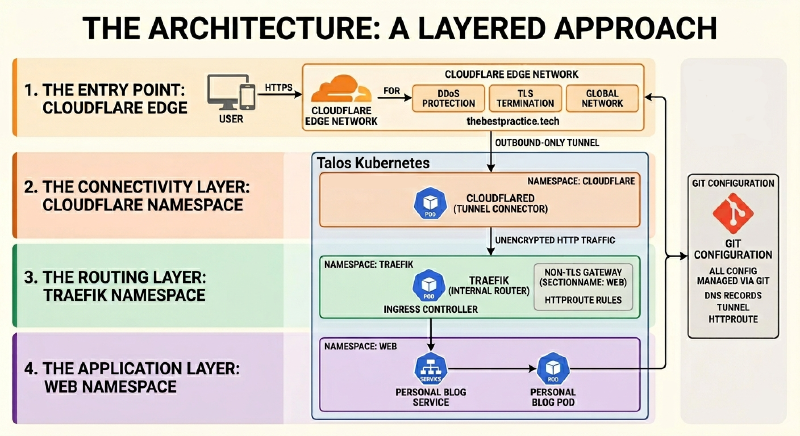
1. The Entry Point: Cloudflare Edge#
A user’s request to thebestpractice.tech is first intercepted by Cloudflare’s global network. The edge handles critical security functions like DDoS protection and TLS termination before any traffic reaches the homelab.
2. The Connectivity Layer: cloudflare Namespace#
cloudflared: This pod establishes a secure, outbound-only tunnel to the Cloudflare network. It acts as the bridge, allowing traffic into the cluster without exposing any public IP addresses or opening firewall ports.
3. The Routing Layer: traefik Namespace#
- Ingress Controller: Traefik resides in its own namespace and serves as the internal traffic controller. It receives all requests from the
cloudflaredtunnel and routes them based onHTTPRouterules.
4. The Application Layer: web Namespace#
- Personal Blog: The blog workload is isolated in the
webnamespace. Traefik forwards traffic to the blog’sService, which in turn directs it to the runningPod.
This layered approach provides clear separation of concerns, enhances security, and aligns perfectly with a declarative GitOps workflow.
A key implication of this architecture is that the in-cluster HTTPRoute will listen on Traefik’s non-TLS gateway (sectionName: web), as TLS is terminated at the Cloudflare Edge. The entire configuration, from the cloudflared connector to the DNS records, is managed through Git.
Why This Architecture?#
A valid question is why the Cloudflare Tunnel directs traffic to a central ingress controller (Traefik) instead of directly to each backend application. While cloudflared can route to individual services, using an ingress controller as the single point of entry for all tunnel traffic offers several advantages, particularly in a GitOps environment:
Simplified Management:#
Instead of managing numerous tunnel configurations or complex ingress rules within the cloudflared ConfigMap, you maintain a single, simple tunnel pointing to Traefik. All subsequent routing is handled by standard, application-specific HTTPRoute resources. This decouples the tunnel infrastructure from application routing.
Streamlined GitOps:#
Exposing a new application becomes a matter of adding a new HTTPRoute to its Argo CD Application manifest. There’s no need to modify the central cloudflared configuration, reducing the chance of misconfiguration and adhering to the principle of application-level autonomy.
Edge vs. In-Cluster TLS Termination:#
In my “The Path to Automated TLS” series, I detailed a common production pattern where the ingress controller terminates TLS using certificates from Let’s Encrypt and how to use Technitium to simulate a public DNS zone in your local network. This is ideal when your ingress is directly exposed to the internet. However, the Cloudflare Tunnel architecture shifts this responsibility.
By default, the tunnel relies on Cloudflare’s edge to handle TLS termination for traffic coming from the public internet. The connection from Cloudflare’s network to the
cloudflaredpod in your cluster is then secured within the tunnel itself. This means the traffic arriving at Traefik is plain HTTP.For a homelab, this is a pragmatic and secure approach. It simplifies the in-cluster setup, as we don’t need to manage public-facing certificates with cert-manager. We let Cloudflare handle the public-facing TLS and focus our in-cluster routing on the unencrypted HTTP traffic, which is why all
HTTPRoutemanifests for public services must target Traefik’swebgateway, notwebsecure.
Ultimately, this model provides a cleaner separation of concerns with no significant security drawbacks for a homelab or small-to-medium deployment.
A Note on Cloudflare’s Free Plan I spent a few hours debugging this, so learn from my experience: the free Cloudflare plan only issues edge certificates for your root domain (
thebestpractice.tech) and first-level subdomains (*.thebestpractice.tech). You cannot expose services on deeper subdomains likemyapp.infra.thebestpractice.tech. With this architecture on a free plan, all your public services must be exposed on a first-level subdomain (e.g.,app1.thebestpractice.tech,app2.thebestpractice.tech).
Prerequisites#
This guide assumes you have a functioning Kubernetes platform managed by Argo CD, as detailed in previous posts. Specifically, you should have:
- A Kubernetes cluster managed by Argo CD.
- A domain managed by Cloudflare.
- Traefik installed as your ingress controller.
- External Secrets configured for secret management.
Step 1: Declarative Namespace and Tunnel Creation#
As is standard practice in this homelab, we configure everything declaratively in code. Instead of using imperative kubectl or cloudflared CLI commands, we define our resources in the homelab-k8s-argo-config repository.
First, the cloudflare namespace is defined in the base/namespaces/namespace.yaml file, ensuring Argo CD creates it before any other resources are synced.
Next, we create the tunnel itself. While the initial tunnel creation is a one-time command, its ongoing management is purely declarative.
- Authenticate
cloudflared: Runcloudflared tunnel loginonce to authenticate your machine with your Cloudflare account. - Create the Tunnel: Run
cloudflared tunnel create k8s-dev-homelab. This generates a tunnel UUID and a crucialcredentials.jsonfile in~/.cloudflared/. - Store the Credential: The content of this JSON file is a secret, which I store in 1Password, ready to be synced by the External Secrets operator.
Step 2: Manual DNS Configuration#
With the tunnel created, we need to point a public DNS record to it. In a fully automated GitOps workflow, you would typically use a tool like external-dns to manage DNS records declaratively. I plan to cover my external-dns setup in a future post.
However, for this specific use case, I’m creating the record manually in the Cloudflare dashboard for two main reasons:
- Simplicity: It’s a single, one-time setup per tunnel.
- Free Plan Limitations: As mentioned earlier, the free Cloudflare plan restricts which subdomains you can use. A manual approach avoids any potential conflicts with an automated tool trying to create records for unsupported hostnames.
In the Cloudflare DNS dashboard for your domain, create a CNAME record:
- Type:
CNAME - Name: The hostname you want to use (e.g.,
hugo-traefik). - Target: Your tunnel’s unique ID followed by
.cfargotunnel.com. (e.g.,<TUNNEL_UUID>.cfargotunnel.com).
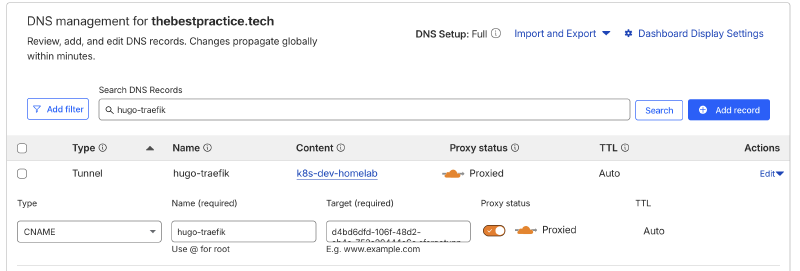
Cloudflare will automatically route traffic for hugo-traefik.thebestpractice.tech to the tunnel.
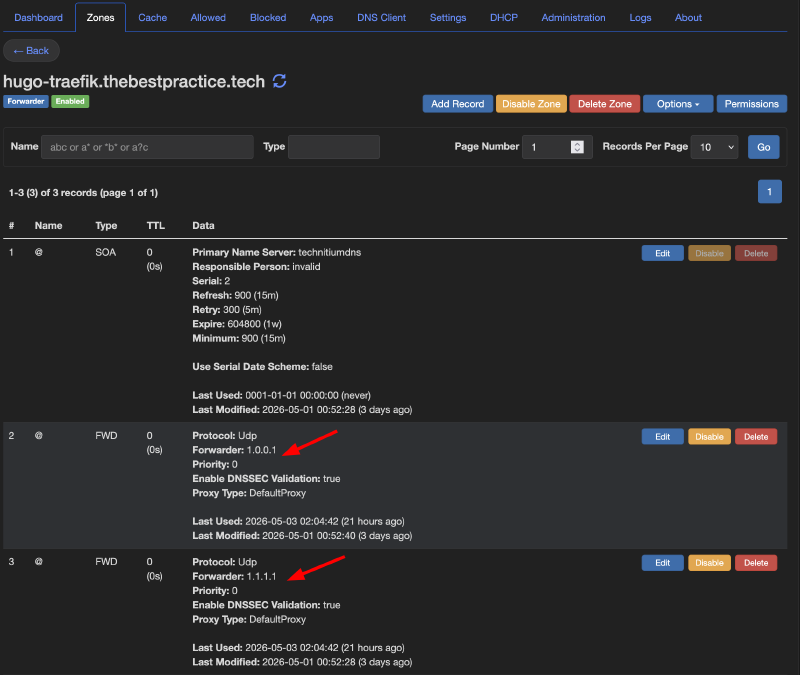
A Note on Internal DNS In my homelab, the
thebestpractice.techdomain is managed authoritatively by an internal Technitium DNS server. To ensure internal clients can still resolve the public-facing services correctly, I use a conditional forwarder in Technitium. Any request for the specific public hostname (e.g.,hugo-traefik.thebestpractice.tech) is forwarded to public DNS resolvers like1.1.1.1, while all other internal records continue to resolve locally.
Step 3: The GitOps Structure for cloudflared#
With the secret stored and DNS configured, the rest of the configuration lives entirely in Git. In my homelab-k8s-argo-config repository, I have a dedicated application for the Cloudflare Tunnel. The setup follows the layered pattern used for all applications: a base configuration with environment-specific overlays.
The base, located under base/ingress/cloudflare/, contains the core manifests:
- secret.yaml: An ExternalSecret manifest that instructs the External Secrets operator to fetch the tunnel credential from 1Password and create a standard Kubernetes
Secret. - configmap.yaml: A ConfigMap that holds a placeholder
cloudflaredconfiguration. - deployment.yaml: A Deployment manifest to run the
cloudflaredconnector as a pod in the cluster.
This base provides a generic template. The real power comes from the Kustomize overlay for each environment. For the dev environment, the overlay is defined in environments/dev/ingress/cloudflare/custom-values/kustomization.yaml.
This file uses Kustomize patches to override the base configuration:
It patches the
ConfigMapto insert the environment-specificconfig.yaml, defining the correct tunnel name (k8s-dev-homelab) and the exact hostname to route https://hugo-traefik.thebestpractice.tech.It patches the
ExternalSecretto point to the correct secret path in 1Password for the dev tunnel credentials.
Here is the key part of the kustomization.yaml patch, which defines the ingress routing for the dev environment:
# environments/dev/ingress/cloudflare/custom-values/kustomization.yaml
- op: replace
  path: "/data/config.yaml"
  value: |
    # Name of the tunnel you want to run
    tunnel: k8s-dev-homelab
    credentials-file: /etc/cloudflared/creds/credentials.json
    # ... other settings ...
    ingress:
    - hostname: hugo-traefik.thebestpractice.tech
      service: http://traefik.traefik.svc.cluster.local:80
    # A catch-all rule to return a 404 for any other requests
    - service: http_status:404
The root Argo CD Application for this setup, root-cloudflare.yaml, points to this custom-values directory. Argo CD then processes the Kustomize overlay, combines it with the base, and syncs the resulting, environment-specific manifests to the cluster. This ensures that while the base is generic, the deployed configuration is tailored precisely for the dev environment.
Step 4: Routing with Traefik’s HTTPRoute#
In the previous post, we deployed the blog and exposed it locally using a simple port-forward. Now, we’ll create the final HTTPRoute to expose it securely to the internet. This directs traffic from the tunnel to the blog service.
# From homelab-k8s-environments-apps repository
kind: HTTPRoute
apiVersion: gateway.networking.k8s.io/v1beta1
metadata:
  name: hugo-traefik
  namespace: web
spec:
  parentRefs:
    - kind: Gateway
      name: traefik-gateway
      namespace: traefik
      sectionName: web # Note: we use the HTTP listener
  hostnames:
    - hugo-traefik.thebestpractice.tech
  rules:
    - matches:
        - path:
            type: PathPrefix
            value: /
      backendRefs:
        - name: hugo
          kind: Service
          port: 80
Conclusion: Production Patterns, Homelab Security#
We have successfully configured a Cloudflare Tunnel to securely pipe traffic to our Traefik Ingress Controller, with all routing managed by declarative HTTPRoute resources. The entire process is managed through a GitOps workflow in Argo CD, making the setup automated, reproducible, and resilient.
My posts are not always easy to read and are certainly not for beginners. However, I struggled to find comprehensive guides that covered this specific, fully-declarative ingress architecture. I hope this detailed walkthrough proves useful to others building their own production-inspired platforms.
Stay tuned. Andrei