
In the previous post, I laid out my plan: treat this blog as a production application and host it using the same standards I apply when architecting platforms for private banking and fintech.
I originally stated that “Phase 1” would cover both containerization and CI/CD in a single swoop. However, as I started writing out the implementation details, it became obvious that throwing enterprise-grade security, image optimization, and pipeline automation into one article was going to be overwhelming.
Instead, I’ve decided to split Phase 1 into two parts. Today, we’re focusing on the first piece of the puzzle: containerizing a Hugo static site properly. In the next post, we’ll cover the GitHub Actions CI/CD pipeline that builds it.
The Public Companion Repository#
To make this series truly reproducible as promised, I’ve created a public companion repository at github.com/anvaplus/hugo-blog-example.
Since my main repository holds a large historical archive and unpublished drafts, this public repo is intentionally scoped to focus on the deployment plumbing. It contains the exact same Hugo layout, Blowfish theme integration, Dockerfile, and Nginx configuration that we’re about to cover. If you want to follow along, clone that repository and build the environment yourself.
The Problem with “Standard” Dockerfiles#
If you search for “Hugo Dockerfile,” you’ll find hundreds of tutorials. Most of them will get your site running, but almost all of them fail a basic security review. They typically suffer from:
- Running as
root(a massive security risk in Kubernetes). - Using bloated base images like
ubuntuornode, dragging hundreds of unnecessary packages and their associated Common Vulnerabilities and Exposures (CVEs) into production. - Leaving build tools inside the final runtime image.
- Using default Nginx configurations that leak server versions and lack crucial HTTP security headers.
In a highly regulated environment, deploying an image like that triggers immediate alarms from the security team. A static site should be just that: static. The container computing environment it runs in should have the absolute minimum attack surface possible.
The Multi-Stage Build#
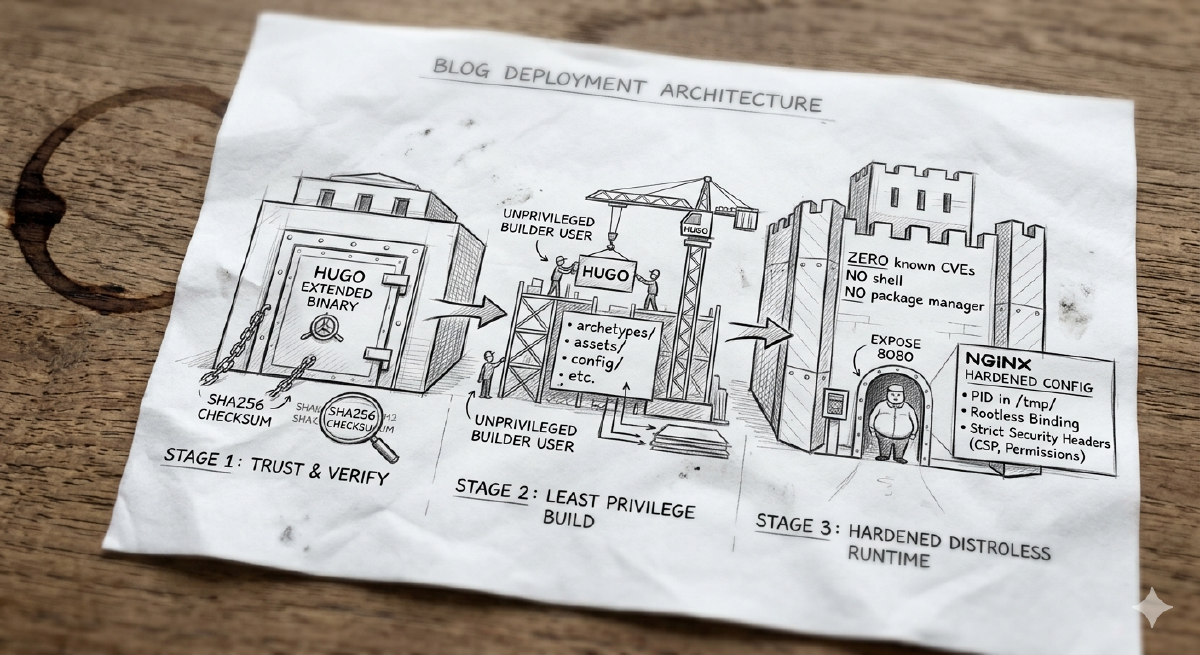
To solve this, I use a three-stage Docker build. Multi-stage builds allow us to use heavy dependencies to assemble our application, then extract only the compiled artifacts into a fresh, bare-bones runtime image.
Here is the complete Dockerfile that powers this blog:
# syntax=docker/dockerfile:1.7

ARG HUGO_VERSION=0.157.0

# ---------------------------------------------------
# Stage 1: Securely download and verify Hugo
# ---------------------------------------------------
FROM alpine:3.22 AS hugo-installer

ARG HUGO_VERSION

RUN set -eux; \
    apk add --no-cache ca-certificates tar wget; \
    arch="$(uname -m)"; \
    case "$arch" in \
        x86_64|amd64) hugo_arch='amd64' ;; \
        aarch64|arm64) hugo_arch='arm64' ;; \
        *) echo "Unsupported architecture: $arch" >&2; exit 1 ;; \
    esac; \
    hugo_archive="hugo_extended_${HUGO_VERSION}_linux-${hugo_arch}.tar.gz"; \
    wget -O "/tmp/${hugo_archive}" "https://github.com/gohugoio/hugo/releases/download/v${HUGO_VERSION}/${hugo_archive}"; \
    wget -O /tmp/hugo_checksums.txt "https://github.com/gohugoio/hugo/releases/download/v${HUGO_VERSION}/hugo_${HUGO_VERSION}_checksums.txt"; \
    cd /tmp; \
    grep " ${hugo_archive}$" /tmp/hugo_checksums.txt | sha256sum -c -; \
    tar -xzf "/tmp/${hugo_archive}" -C /tmp hugo; \
    install -m 0755 /tmp/hugo /usr/local/bin/hugo

# ---------------------------------------------------
# Stage 2: Build the static site as a non-root user
# ---------------------------------------------------
FROM alpine:3.22 AS builder

ENV HUGO_ENV=production \
    HUGO_ENVIRONMENT=production

WORKDIR /src

RUN set -eux; \
    apk add --no-cache ca-certificates git libc6-compat libgcc libstdc++; \
    addgroup -S builder; \
    adduser -S -G builder -h /home/builder builder; \
    mkdir -p /src /tmp/hugo_cache /home/builder; \
    chown -R builder:builder /src /tmp/hugo_cache /home/builder

COPY --from=hugo-installer /usr/local/bin/hugo /usr/local/bin/hugo

# Copy project files
COPY --chown=builder:builder archetypes/ /src/archetypes/
COPY --chown=builder:builder assets/ /src/assets/
COPY --chown=builder:builder config/ /src/config/
COPY --chown=builder:builder content/ /src/content/
COPY --chown=builder:builder data/ /src/data/
COPY --chown=builder:builder i18n/ /src/i18n/
COPY --chown=builder:builder layouts/ /src/layouts/
COPY --chown=builder:builder static/ /src/static/
COPY --chown=builder:builder themes/ /src/themes/

# Switch to non-root user for the build
USER builder

RUN set -eux; \
    hugo --gc --minify --cacheDir /tmp/hugo_cache --destination /tmp/public

# ---------------------------------------------------
# Stage 3: The Distroless Runtime
# ---------------------------------------------------
FROM cgr.dev/chainguard/nginx:latest AS runtime

LABEL org.opencontainers.image.title="personal-blog" \
      org.opencontainers.image.description="Hardened container image for the personal blog" \
      org.opencontainers.image.source="https://github.com/anvaplus/personal-blog"

COPY --chown=65532:65532 docker/nginx.conf /etc/nginx/nginx.conf
COPY --from=builder --chown=65532:65532 /tmp/public/ /usr/share/nginx/html/

USER 65532:65532

EXPOSE 8080
Let’s break down the “why” behind this architecture.
Stage 1: Trust, but Verify#
We do not rely on random Alpine package repositories to have the exact Hugo version we need. Instead, we grab the official release directly from GitHub. More importantly, we don’t just blindly execute downloaded binaries. The script downloads the sha256sum file, specifically searches for the checksum of the archive we downloaded, and verifies its cryptographic integrity before installing it. In an enterprise setting, verifying software supply chains is non-negotiable.
Stage 2: Principle of Least Privilege in CI#
Even during the build phase, running as root is a bad practice. The second stage configures the Alpine OS and ensures the actual Hugo site compilation is run under a dedicated, unprivileged builder user.
We simply pass in the hugo binary compiled in Stage 1, copy over only the relevant directories to prevent local cache poisoning, and run Hugo with --gc (garbage collection) and --minify options to keep the generated HTML/CSS/JS footprints tiny.
Stage 3: The Chainguard Distroless Runtime#
This stage is the only one that makes it into production, and it’s where we achieve our “Fort Knox” status. I’m using cgr.dev/chainguard/nginx:latest.
Chainguard images are distroless and heavily hardened. A distroless runtime means there is no package manager (no apk or apt), no shell (bash or sh), and no common UNIX utilities. If an attacker somehow achieves remote code execution in this container, they have zero tools available to pivot or escalate. Furthermore, Chainguard images are built to guarantee zero known CVEs, running securely as a non-root user (65532:65532) by default.
Hardening the Nginx Configuration#
A secure container still needs a secure web server. Running Nginx rootless on Kubernetes means we must bind to a high port (in this case, 8080), as binding to port 80 typically requires root privileges.
Here is the docker/nginx.conf that gets mapped into the distroless container:
pid /tmp/nginx.pid;

events {
    worker_connections 1024;
}

http {
    include /etc/nginx/mime.types;
    default_type application/octet-stream;

    access_log /dev/stdout;
    error_log /dev/stderr warn;

    sendfile on;
    tcp_nopush on;
    keepalive_timeout 65;

    # Never leak the Nginx version
    server_tokens off;

    server {
        listen 8080;
        listen [::]:8080;
        server_name _;

        root /usr/share/nginx/html;
        index index.html;

        client_body_temp_path /tmp/nginx-client-body;
        proxy_temp_path /tmp/nginx-proxy-temp;
        fastcgi_temp_path /tmp/nginx-fastcgi-temp;
        uwsgi_temp_path /tmp/nginx-uwsgi-temp;
        scgi_temp_path /tmp/nginx-scgi-temp;

        # Standard Security Headers
        add_header X-Content-Type-Options "nosniff" always;
        add_header X-Frame-Options "SAMEORIGIN" always;
        add_header Referrer-Policy "strict-origin-when-cross-origin" always;

        # Advanced Security Permissions
        add_header Permissions-Policy "accelerometer=(), autoplay=(), camera=(), geolocation=(), gyroscope=(), magnetometer=(), microphone=(), payment=(), usb=()" always;
        add_header Content-Security-Policy "default-src 'self'; base-uri 'self'; form-action 'self'; frame-ancestors 'self'; img-src 'self' data: https:; object-src 'none'; script-src 'self' 'unsafe-inline'; style-src 'self' 'unsafe-inline'; font-src 'self' data:; connect-src 'self' https:; upgrade-insecure-requests" always;

        # Kubernetes Readiness/Liveness probe endpoint
        location = /healthz {
            access_log off;
            return 200 'ok';
            add_header Content-Type text/plain;
        }

        # Block access to hidden files (.git, .env, etc.)
        # except for .well-known for ACME/Let's Encrypt
        location ~ /\.(?!well-known/).* {
            deny all;
            access_log off;
            log_not_found off;
        }

        # SPA-friendly fallback routing
        location / {
            try_files $uri $uri/ /index.html;
        }
    }
}
Notice the specific enterprise best-practices we’ve implemented:
- Container compatibility: Paths for cache (
/tmp/nginx-*) are explicitly moved to/tmp/, ensuring that our read-only root filesystem doesn’t break Nginx operations. Logs are streamed tostdout/stderr—perfect for a Kubernetes logging aggregator to pick them up. - Kubernetes Health Checks: The dedicated
/healthzendpoint allows Kubernetes readiness and liveness probes to constantly monitor the pod without spamming the main access logs. - Defense in Depth via Headers: The rigorous
Content-Security-PolicyandPermissions-Policyrestrict exactly what the browser is allowed to execute or load. Turning offserver_tokensprevents attackers from easily querying the exact Nginx version.
What We Achieved#
We took a basic static site generator and wrapped it in a highly-secured, verified, and hardened container. It runs without root privileges, actively denies unexpected system behavior, strictly enforces browser security policies, and has zero exploitable runtime packages—which is exactly how you safely build and package an application in modern engineering.
If you clone the companion repository, you can build and test this exact hardened setup locally right now:
docker buildx build --load -t personal-blog:local .
docker run --rm -p 8080:8080 personal-blog:local
Now that we have an artifact worthy of production, we need an automated way to build it.
In the next post, we will build a GitHub Actions pipeline to automatically build, scan for vulnerabilities, version using the Automated Semantic Versioning Strategy I described previously, and push this container image to a registry every time we merge to main.
Stay tuned! Andrei