
This is Part 2. If you need the cloud-to-homelab translation and requirement framing, read Part 1: From Cloud Sizing to Requirements first.
In Part 1 I converted production GKE sizing discipline into a concrete homelab requirement set. Now we descend from principles into metal: CPU selection, memory rationale, storage topology, network segregation, and final hardware assembly.
Cross-links:
- Back to Part 1: From Cloud Sizing to Requirements
- Related earlier posts: Why not a homelab?, Segmented Network Build
The Core Decision: CPU Architecture and Performance#
This is where enterprise knowledge directly translates to homelab decisions. In the cloud, I choose machine families based on workload profiles. In the homelab, I choose CPU architectures based on the same principles.
The x86 Requirement#
First, the hard constraint: Proxmox officially supports only x86/x64 architecture. ARM is not supported (unlike some Kubernetes distributions that run on Raspberry Pi). This eliminates ARM-based options and focuses the decision on Intel vs. AMD.
The IPC vs. Core Count Trade-Off#
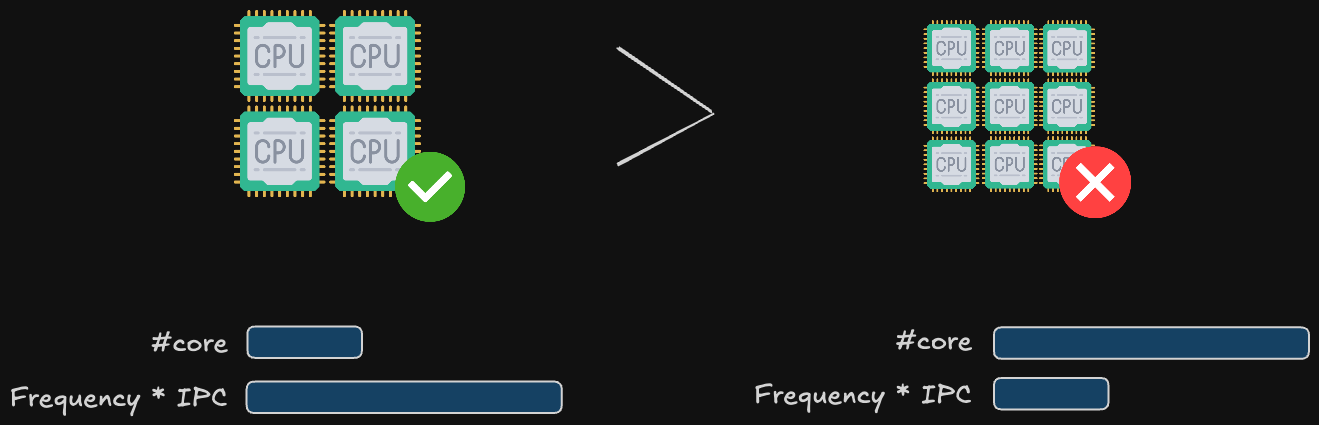
Here’s where my research (and my production experience) converges on a critical insight: for virtualization and most business workloads, fewer cores at higher frequency (and higher IPC) outperform many cores at lower frequency.
IPC (Instructions Per Clock) is the real performance metric, not just GHz. A CPU with high IPC executes more work per clock cycle. This matters enormously for:
Single-threaded workloads: Most business applications (web servers, databases, management software) are not massively parallel. High IPC means faster response times.
Ceph write latency: Proxmox’s distributed storage (Ceph) calculates checksums for every block written, verifying data integrity across nodes. This is CPU-intensive. A high-IPC CPU calculates checksums faster, keeping write latency low and preventing I/O bottlenecks.
Real-world translation: An Intel Core i5-12400 (6 P-cores at 4.4 GHz boost, high IPC) will outperform an older Intel Xeon E5-2680 v2 (10 cores at 2.8 GHz, lower IPC) for virtualization workloads, while consuming less power and costing less.
This is why this kind of CPUs (Ryzen 5/7, Core i5/i7) often outperform server CPUs in homelabs: they prioritize high IPC and frequency over core count, matching the workload profile perfectly.
The Hybrid Architecture Problem (Intel 12th Gen+)#
Modern Intel processors (12th gen Core and newer) use a hybrid architecture: high-performance P-cores (Performance) mixed with high-efficiency E-cores (Efficiency), similar to ARM’s big.LITTLE design.
How This Affects Proxmox:
| Workload Type | Allocation Behavior | Performance Impact |
|---|---|---|
| Virtual Machines | Proxmox typically allocates VMs to P-cores by default | Generally good; E-cores sit mostly idle |
| Containers | Individual processes can be scheduled to any core | Risk: Process lands on E-core, becomes inexplicably slow |
Why this matters: I plan to run LXC containers extensively (which I do for lightweight services like DNS, monitoring agents, etc.), a hybrid architecture introduces unpredictability. A container process might land on a slow E-core, causing performance issues that are difficult to diagnose.
Memory Sizing: From Cloud Abstractions to Physical RAM#
In GCP, I specify memory in GB and it’s provisioned instantly. In the homelab, every GB of RAM is a physical purchase decision that affects cost and performance.
The ZFS Tax (Single Node)#
Proxmox favors ZFS as the root filesystem for its superior data integrity features (checksumming, snapshots, compression). But ZFS is a memory hog; it uses RAM aggressively for caching (ARC - Adaptive Replacement Cache).
Rule of Thumb: For optimal ZFS performance on a single Proxmox node, reserve 50% of total RAM for ZFS caching.
The Ceph Factor (3-Node Cluster)#
In the cloud, storage is abstracted: Persistent Disks, block storage, object storage. You pay for capacity and IOPS, and the provider handles durability (11 nines of durability for GCS, for example). In the homelab, you own the failure risk.
SSD vs. NVMe vs. HDD#
The Hierarchy:
NVMe SSD: Essential for Proxmox installation and Ceph OSDs (the distributed storage pool). High IOPS, low latency. Use this for VM root disks and databases.
SATA SSD: Acceptable for Proxmox, decent for Ceph, but slower than NVMe. Good for budget builds.
HDD (Mechanical): Only for secondary storage with ZFS (backups, archival, media storage). Never use for Proxmox root or Ceph OSDs. I/O latency will cripple performance.
This mirrors how we use storage classes in Kubernetes: SSD-backed persistent volumes (PVs) for databases (via StorageClass with gce-pd-ssd), HDD-backed PVs for logs and backups.
The TBW Metric (Total Bytes Written)#
Here’s the homelab-specific concern cloud users never think about: SSD lifespan.
TBW (Total Bytes Written) is the total amount of data you can write to an SSD over its lifetime. Once you hit the TBW limit, the drive must be retired (it will start failing).
Key insights from my research:
TBW scales with capacity: A 2TB NVMe drive typically has a much higher TBW than 500GB/1TB drives. For example, a mainstream 2TB NVMe might advertise 1200 TBW or more depending on NAND type and controller.
Ceph and Proxmox are write-heavy: With Ceph OSDs on NVMe, expect sustained small writes (metadata, journals) plus periodic scrubbing and recovery traffic.
Estimate write rates and practical lifespan: If your cluster writes 50–100GB/day across all VMs and services (realistic for an active homelab), a 1200 TBW 2TB drive yields:
- 1,200,000 GB ÷ 100 GB/day = ~32 years (theoretical). Real-world factors (write amplification, workload spikes) mean planning for 5–10 year replacement cycles is prudent.
Write Amplification & Utilization: Due to SSD block management and ZFS/Ceph interactions, actual NAND writes can be 2–3× logical writes. Keep per-drive utilization under 80–85% and prefer NVMe models with good over-provisioning and endurance ratings.
The RAID 1 Diversity Strategy#
Proxmox supports ZFS RAID 1 (mirroring) for the root disk. Standard practice: use two identical SSDs for redundancy.
But here’s the counterintuitive insight from my research: Don’t use two identical SSDs in RAID 1.
Why? If both drives are the same brand and model, they experience identical write patterns. They’ll both approach their TBW limit at the same time and fail simultaneously, defeating the purpose of RAID. Different brands, potentially different NAND types, slightly different wear patterns. If Drive 1 fails at year 5, Drive 2 might last 6-7 years, giving you time to rebuild.
This is enterprise thinking applied to homelab constraints. In production, we don’t care about individual disk longevity (the cloud provider handles it), but the principle of avoiding correlated failures is the same: we distribute pods across multiple availability zones, use different node pools for critical services, and avoid single vendor lock-in.
Networking: Separating Control and Data Planes#
In any production-grade cluster, network segmentation is non-negotiable. You must isolate different types of traffic to ensure performance, security, and reliability. The most critical separation is between the control plane and the data plane.
- Control Plane Traffic: This includes cluster consensus messages (like Corosync in Proxmox), management UI access, and other low-bandwidth, latency-sensitive communication. This traffic must be protected from congestion at all costs. A failure here can lead to a “split-brain” scenario where nodes lose contact and the cluster disintegrates.
- Data Plane Traffic: This is the high-bandwidth traffic generated by your workloads. It includes VM/container network I/O, storage replication (like Ceph), and backups. This traffic is bursty and can easily saturate a network link.
By using physically separate network interfaces and switches for each plane, you create a robust architecture that mirrors enterprise best practices. The control plane remains stable and responsive, unaffected by data-intensive operations on the data plane. I covered the blueprint for this in my network build post, and the hardware I chose directly enables this design.
The Single NIC Compromise#
For those with single-NIC mini PCs, all is not lost. It is possible to run a cluster on a single network link, but it requires careful mitigation:
Mitigation: Managed Switch with QoS
Using a capable managed switch, you can create VLANs to logically separate traffic and apply Quality of Service (QoS) rules to prioritize Corosync packets above all else. This ensures that even if VMs saturate the link, the cluster’s heartbeat remains stable.
This approach forces you to learn valuable enterprise networking skills (VLANs, QoS, traffic shaping), but it introduces complexity and a single point of failure (the single NIC and cable). Given the availability of affordable dual-NIC mini PCs, a physically separate network is the recommended path for new builds.
My Final Hardware Selection#
| Component | Quantity | Rationale |
|---|---|---|
| GMKtec M5 Plus (Ryzen 7 5825U, dual 2.5GbE) | 3 | HA Proxmox + Kubernetes + Ceph cluster nodes |
| 32GB RAM per node | 3 kits | Memory headroom for ARC, Ceph, workloads |
| NVMe 1TB (OS disks) | 3 | Isolate system + platform services |
| NVMe 2TB (Ceph OSD disks) | 3 | Capacity + performance for replicated storage |
| UGREEN 2.5GbE unmanaged switches | 2 | Physical separation of management vs data traffic |
| ZimaBlade (PBS) | 1 | Dedicated backup server; keeps backup tasks off cluster |
| OPNsense router/firewall | 1 | VLAN segmentation, Zero Trust patterns, ingress control |
Physical Topology: Implementing the Segregated Network#

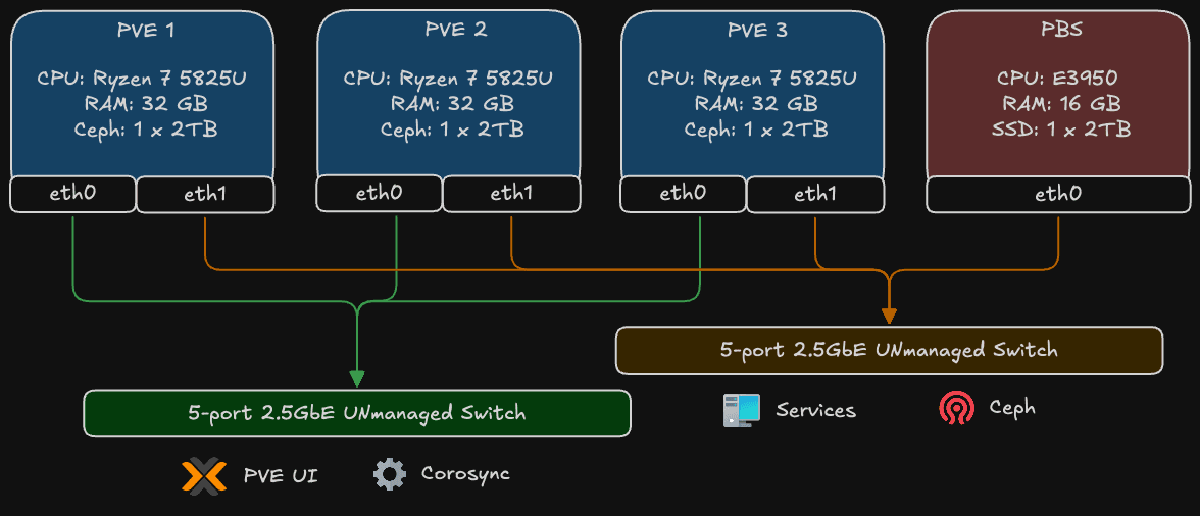
The diagram above illustrates the physical network topology, which is the cornerstone of the cluster’s resilience. It shows how the four main hardware components - the three Proxmox VE nodes (PVE 1, 2, 3) and the Proxmox Backup Server (PBS) - are interconnected.
The key principle is the strict separation of network traffic using two distinct, physical switches. Each Proxmox node utilizes its dual 2.5GbE network interfaces (eth0 and eth1) to connect to both switches simultaneously.
1. The Control Plane
- Connections: The first network interface (
eth0) of all three Proxmox nodes connects to a dedicated 2.5G unmanaged switch. - Traffic: This network is exclusively for low-bandwidth, latency-critical management traffic:
- Corosync: This is the cluster’s heartbeat. It requires a stable, low-latency link to maintain quorum and node consensus. Isolating it here prevents data-plane congestion from causing a “split-brain” scenario.
- PVE UI/API: Management access to the Proxmox web interface.
2. The Data Plane
- Connections: The second network interface (
eth1) of all three Proxmox nodes, along with the interface from the Proxmox Backup Server, connects to a second high-speed 2.5G unmanaged switch. - Traffic: This network is built for high-throughput operations:
- Ceph Traffic: All storage-related communication for the distributed Ceph cluster, including OSD heartbeats, data replication, and recovery operations.
- VM/Container Traffic: The actual network I/O for the applications and services running inside virtual machines and containers.
- Backup and Restore: Data transfer between the Proxmox nodes and the dedicated PBS. The 2.5G speed is crucial for minimizing backup windows and enabling fast restores.
This physical separation ensures that a massive data transfer, like a full backup or a Ceph rebalance, cannot saturate the network and disrupt the essential Corosync communication on the control plane. It’s a simple but powerful design that brings enterprise-level network reliability to the homelab.
Lessons Applied from Production#
| Production Principle | Homelab Expression |
|---|---|
| Control/Data plane separation | Dual physical switches + VLAN layers |
| Quorum & failure tolerance | 3-node Proxmox + 3 OSDs |
| Observability first | Prometheus/Grafana deployment baseline |
| GitOps discipline | ArgoCD managing cluster state |
| Secrets hardening | Vault integration for dynamic secrets |
| Backup isolation | Dedicated PBS node |
| Performance right-sizing | IPC-focused CPU choice, endurance-aware storage |
Closing Synthesis#
Enterprise discipline, applied thoughtfully, scales down beautifully. The exercise isn’t copying production… it’s preserving the patterns (redundancy, segmentation, observability, controlled failure domains) while respecting homelab constraints (power, space, noise). This build becomes a living reference: a small, silent cluster where I can rehearse patterns before advocating them at scale.
Andrei
End of Part 2